Feel free to share
 Using this site means trees will be planted. ^.^
(Find out more)
Town creator
This town creator allows you to drag and drop various pieces in order to create a town or city to your liking. The tool tends to work best as either a planning tool or to create a partial map that is then later edited to improve upon the functionalities that are missing, like curved roads for example.
But this makes for a great tool to create quick towns for tabletop role playing games and other projects you need quick references for and just all around fun props to hand to players or yourself.
Instructions
The tool is mostly very straight forward. You click on the categories to view the various pieces and then click on a piece to add it to the map. Once it's on the map you can resize the piece, drag it around, rotate it, delete it and even copy it.
Click:
When you click on a piece you've added to the map not only will it be selected and thus gain an orange border, the piece will also be placed on top of all other pieces within that same layer. This way you don't have to worry about which item you add first as the order of layering can be changed at all times.
Rotate:
To rotate a piece click on the piece you want to rotate so it gets an orange border. Once selected enter the degrees you want to rotate it by in the little text box and then click on 'rotate selected'. The piece will automatically be rotated.
Grid snap:
By toggling 'grid snap' on all pieces will stick to a grid when you move them. This means you have less freedom in terms of moving your pieces around, but it does mean it becomes much easier to keep all the pieces on the same level, which is very useful when creating straight rows of homes for example.
Resize:
To resize the piece you simply drag the sides or the little arrow icon in the bottom right corner. You can toggle being able to resize the piece on and off by clicking the 'toggle resize'. This way you won't accidentally resize images when you don't want to.
Copy:
By clicking the 'copy selected' button an exact copy of the item you've selected will be placed on top of that same item. This way it's far easier to add items of the same size and rotation to your map.
Delete, clear layer & clear all
To get rid of a single piece simply select it and click the 'delete selected' button. To clear an entire layer click the 'clear layer' button and to get rid of everything simply click the 'clear all' layer.
Select and toggle layers
There are 3 layers on which you can add map pieces. The bottom one is selected by default, but there's 2 more above it and 1 below it. The one below it is a background layer however and only used for colors and images (more on that later).
The point of the layers is to make it easier to add images on top of each other. For example, the bottom layer could be used for fields, roads and other larger elements. The middle layer for homes and buildings and the top layer for chimneys and other small elements. The different layers help with making sure there aren't too many elements at one spot you have to deal with.
Each layer can also be toggled, this makes accessing the elements on the lower layers much easier.
Background image and color
There are 2 input fields for the background layer. The first is the image input in which you can add any url in order to add an image hosted online to the generator. This way you can easily add custom roads and other elements to your map and thus have more customization options.
If you'd rather stick with one solid color, perhaps a sandy desert or a field of grass, simply click the color input field and select the color you wish (only works in modern browsers).
Set width and height
If you need more building space you can use the set width and set height input fields and buttons to change the width and height of the canvas. This also helps with making sure your background image fits better.
Pick building type
As of right now there are 4 'building materials' to pick from. Wood, stone, clay and sandstone. By clicking on the little color icons all the relevant images in the menu will change to the corresponding material. This way you can more easily create better looking desert towns for example. More may be added in the future.
Save and load
Up to 4 towns can be saved using the save buttons. Once saved you can load the saved town any time you want even after closing your browser. The town is saved locally in your browser however, so if you're using incognito mode or if you clear your cache completely you will likely lose your town again. I'd recommend creating a backup of your town as a screenshot, this way you could always set it as a background again and continue building on top of this image.
Saving locally
It's also possible to save your town data locally. Simply click the "Save local" button to have the code create a text file with all the town code in it, then click on the download link to download it directly to your computer. Now you can use the "Choose file" field to upload your town data and use it in the future. This method makes sure there's no risk of losing all your data in case your browser data is wiped, for example, but it does mean keeping track of your downloaded file.
More on the background image
Adding a background image can be a very powerful element to spice everything up and it doesn't require a lot of skill to create something for your map. I've created a very quick and simple map as an example, using only minimal skills and tools (just a sketchy road and dots for trees) to help illustrate my point.
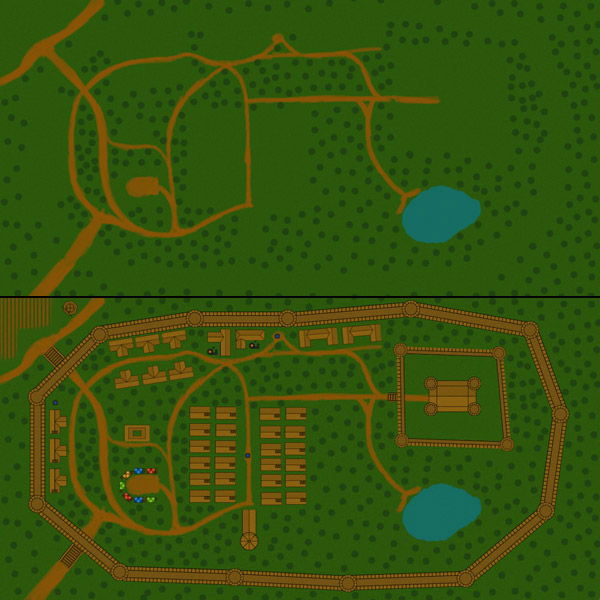
Saving the image
If you wish to save the town you've created all you have to do is click the 'Turn into image' button and an image will appear below it that looks exactly like what you've created. The only difference being that this is a single image, rather than a whole lot of separate images. Simply right click it, select 'save as' and name it what you wish. That's all there is to it.
*Note: Currently the walls and fields do not display properly in the created image, if you really want them to look right the best way to get the image is to simply take a screenshot of the work area.
Commercial use
As mentioned, this tool is meant mostly as a source of inspiration, but the images can be used for non-commercial projects as well, as long as it isn't another town creator or other similar piece of work. However, I cannot allow you to use the images for commercial projects, but feel free to contact me if you do want to use it commercially, we can probably work something out.
At the end of the day this site, which I put a lot of time into, is still a means to create an income for myself, so I do have to protect some assets.